Tuesday, April 16, 2013

Silhouette Tutorial Listings and You Tube Channels


FOLLOW these ladies on YouTube:

Our OWN... Deb Bugjuiced


    Jin Yong - Under a Cherry Tree

    Kerri Bradford

    SarahsWorlds4u

    Debbie H.
    Clever Someday

    How to trace on the Silhouette Cameo for the Print and Cut feature


    Change the color of your Image


    Creating Paths, Editing Points, and Using the Slice Tool

    How to use SSDE's Release Compound Path

    Welding Letters and More

    Modifying Backgrounds

    Cutting Vinyl

    Loading Fonts in your Cameo

    Exploring your Library and Importing files into DE

    Silhouette Designer Edition Knife tool

    Adjusting Your Reg Marks and Save Paper (when print & cutting)

    Filling A Shape with Digital Paper

    TRACE & DETACH TUTORIAL

    How to Color a Dingbat in Silhouette Studio (for print-and-cut)

    Loading your first files into your Silhouette (Unzipping)


    This is how I do it. :) Everyone has their own way. I am NOT a professional. Your computer will be different, your files will show up differently. 

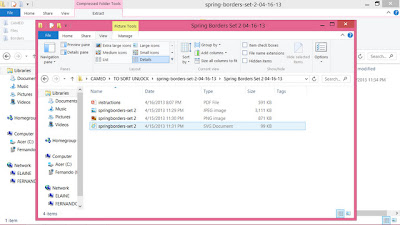
    1. I keep my Silhouette items in the top right of my desktop. I am running Windows 8. I have the shortcut to the software. I have a "To sort and unlock" folder, a "Fonts to load into Sil" folder then a "ready to load" folder. 

    2. When downloading files from places OTHER than the SIL store, you need to put them in a folder you know where they are going. You can tell what kind file you have by sorting the VIEW by File Type.


    3. They are going to be ZIPPED (meaning compressed) you will need to EXTRACT them. (To extract on a Mac please go here.)  To Extract, click the Extract Files at the top in the middle. 


    4. After extracting you will more than likely see several types of files. The file you want is the SVG.


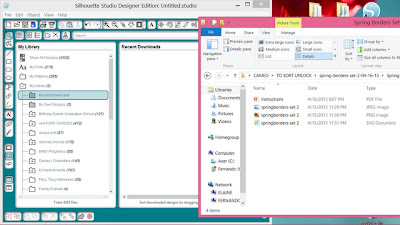
    5. Open the SIL Software (I have Designer's Edition.) Go to "My Library." Click and drag the SVG file and move it into the Library. I put them in the Recently downloaded file so that I can move it to the appropriate file later. 


    6. You will now see the file in the Library in the folder you just put it into. 


    7. From here you can click on the image (double click) and it will open and be shown on the mat.


    You are ready to manipulate. From here you do need to ungroup, trace and cut the file. For those tutorials - search on YouTube or in Cameo Friends files

    Thanks for visiting. I hope to have more tutorials as we go! 

    Thank you

    Friday, March 15, 2013

    Beginner Silhouette Users - START HERE!


    Haven't opened the box yet?? It's ok... Watch this!

    Before you use your mat----
    Take out a microfiber blanket / pillow. Place it sticky side to blanket ... lift and repeat for a total of 3 times. Now it will be perfect!!!

    Also watch the Tutorial Video your machine came with!!


    Exploring your Library and Importing files into DE

    Thinking about getting a subscription to SIL????
    You can look for a code to get a discount on subscriptions, and we do recommend getting the Designer's Edition software.

    Tips:
    • You can change the background color of your screen by clicking on the color ball to the lower right.
    • By RIGHT clicking on your object you have many of the options that are the buttons around the side and bottom.
    • Designer Edition let's you use almost any file, except for a pdf, however you can convert the file online with many different types of converters. Here's one:

    MAC user tips: 

    How to save a PDF as a JPG on a Mac

    Thursday, March 14, 2013

    Beginner on the Silhouette Cameo

    I'm new to the Cameo...got a GREAT deal. Why don't you come learn with me? We need one place to go that is easy to get to - that has beginner video links, beginner hints, helps, etc.

    Let's work together to create a great place for beginners and their Cameo.

    I know that soon I won't be a beginner any more, but as the Cameo grows in popularity, you will need a place to go.

    I have done all my own research, I have over 1300 files and nearly 100 fonts...only have paid less than $20 for a few files. If you upgrade your software (do it when it's on sale for $25) you can do so much more with out having to buy files! :)

    If you are a basic user and don't want to get technical about it, then buying each individual file, might be the thing you want to do. If you are just a little computer savvy you can easily make almost any image into a .studio file.

    I will be composing some helpful links, helpful videos and all kinds of great info. BUT if you have a better way of doing something, want to ADD your link, video, etc... just let me know. Contact me at mrscota92@gmail.com

    Thanks, let's begin!